Thanksgiving is knocking on the door, with Christmas just around the corner and this holiday season, family meals mean more than ever. So, what better way to set the scene for making memories at home than with a beautiful holiday tablescape.
WHAT IS TABLESCAPING?
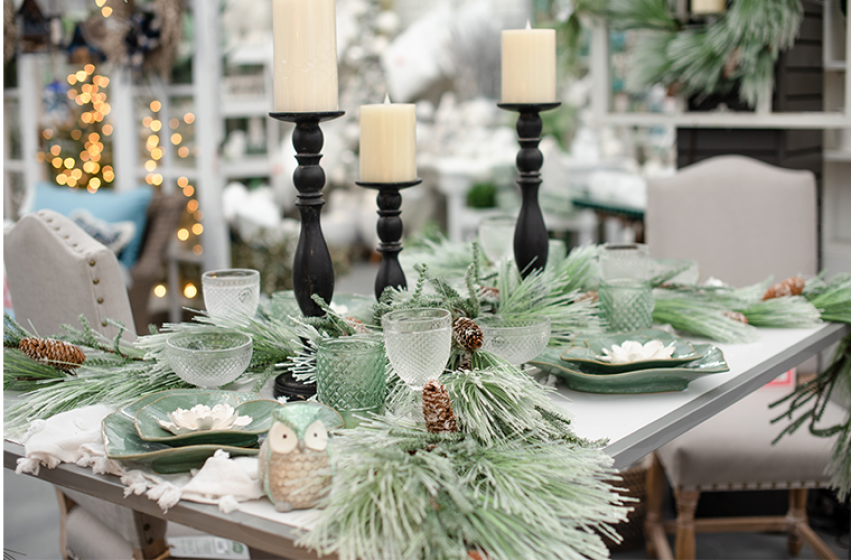
Tablescaping takes the concept of the centerpiece to the next level. Instead of just using a single piece in the center of your table, tablescaping uses an assortment of elements to create a themed vignette limited only by your available table space and your imagination- the sky’s the limit. And don’t just stop at the dining room table. Tablescaping can be done lots of places- mantles, bookshelves, side and entryway tables, etc.
TIP: Tablescaping gives you the opportunity to shop your home. Look around and see what kinds of items you can mix and match- photo frames, mirrors, fabrics, pretty napkins, flowers, foliage, fresh or faux fruits and berries, baskets, books, candles, trays, vases, or bowls.
SIX STEPS TO CREATING A TABLESCAPE
Tablescapes can be super simple, with a few candles or a small floral arrangement, to full-on transformations with custom centerpieces, specialty tableware, linen napkins and more. Follow these six simple steps to create a beautiful tablescape this holiday season.
LAYERING ORDER
The key to a great tablescape is layering your pieces, from the table runner to picks and lights to ornaments and seasonal pieces. Layering helps to create depth, dimension and interest. Before getting started, think of the layering order for assembling your tablescape:
- Start with a base (tablecloth, table runner, placemats, garland, etc.).
- Add in a centerpiece (floral arrangement, pedestals, candles, etc.).
- Next, weave in picks then lights.
- Add in other elements like pumpkins, gourds, apples, votives, pinecones, ornaments, etc.).
STEP 1: CHOOSE A THEME (COLOR OR OVERALL THEME)
Consider the season or the occasion when selecting an overall theme. Use nature’s timing to influence your tablescape. Colorful fall foliage and fall produce (mini pumpkins, gourds, pinecones, etc.) at Thanksgiving or fresh or faux greenery and berries at Christmas. Everything on your table should correspond to the chosen palette. We recommend choosing two or three complementary colors (drawing inspiration from your centerpiece), and one contrasting color.
STEP 2: CHOOSE A CENTERPIECE
Once you have chosen a theme and color palette, decide on your centerpiece. Oftentimes, the centerpiece provides the inspiration for the rest of the décor. Whether your scheme is pumpkin-inspired fall or festive holiday, your centerpiece serves as the foundation and focal point of the table. Centerpieces can include but are not limited to:
floral arrangements • seasonal holiday décor or produce (ornaments, pumpkins, gourds, persimmons) • flowers and plants • assorted candles • pedestals or cake stands • and more.
TIP: Use a variety of heights and textures to add dimension to your design. Just remember not to pile your tablescape too high or your guests may have a hard time seeing each other across the table.
STEP 3: CHOOSE A BASE
Select from garlands or individual greens (fresh or faux), table runners, tablecloths, etc. Whether you use fresh or faux greenery is really up to you. Nothing says Christmas like the smell of fresh-cut greens, but keep in mind that they do require regular care and don’t last as long. Faux garlands and greenery don’t have an expiration date and come in lots of options including pre-lit and pre-decorated. This can make decorating more efficient. A faux garland also allows you to easily transition from Thanksgiving to Christmas, letting you use the same garland for both seasons. If you’re using a table runner, opt for a neutral one. Often bold prints or heavy floral runners can distract from the overall design.
TIP: For round or square tables, wrap the garland in a circular shape. Make sure to fluff all the branches, so they are spread out evenly.
STEP 4: ADD PICKS
Now it’s time to add more texture and depth to your base. Depending on the season, use holiday-inspired picks and sprays. Make sure you balance each side (what you add to one side, add the same to the other side).
STEP 5: ADD LIGHTING
Lights add ambiance, dimension and sparkle to your design and are available in a variety of styles, sizes and colors. Be sure to consider string light length in your design. Light options include but are not limited to:
Invisilites • Durawise lights • votives or candlesticks • candles (real or flameless) • lanterns • and more.
TIP: Flameless candles are ideal for tablescape designs. They’re safe- no flame, no mess, drips, or spills.
Invisilites - are micro LED lights on a thin, flexible wire that are super easy to use. They come in a variety of styles, designs and colors, that can be coordinated with any décor for the holiday season or to use year-round.
Simplux Candles - are stunningly realistic and feature patented TRUE-FLAME Technology® that makes them virtually indistinguishable from the real thing. The three-dimensional flame will never burn out, always remains cool to the touch, and are safe for use around children and pets.
Lumineo Durawise Lights – these battery operate lights are available in either 48 or 96 light counts and can be used indoors or outdoors. With a built-in timer that stays on for 6 hours and turns off for 18, all you do is set it and forget it. Available in cool white, warm white, and multi-colored with a choice of black or transparent wire.
STEP 6: ADDITIONAL EMBELLISHMENTS
Depending on the time of year, incorporate additional seasonal elements for added interest. Bring in outdoor elements from your yard like pinecones, twigs, greenery, and flowers. Incorporate platters, candlesticks and candles – anything goes! Embellishments can include but are not limited to:
fresh or faux greenery • pinecones • berries • flowers • fruits (red or green apples, oranges, lemons, limes, persimmons, etc.) • ribbon • lights • ornaments • candles • pedestals and vases • twigs • and more.
TIP: Add ribbon last. Cut ribbon into smaller pieces. Pinch the ends and work ribbon into your design (a piece at a time) instead of using one continues piece of ribbon, which can be cumbersome to work with. This method works well in trees too.
Click here to view The Garden Guru's video "How to Make a Holiday Tablescape."